Nginx merupakan salah satu webserver yang sekarang ini banyak digunakan sebagai web server maupun sebagai web server dibekalang Apache, ketangguhan Nginx tidak diragukan lagi karena sudah banyak website-website besar yang menggunakan Nginx, sebut saja contohnya WordPress. Di Fedora instalasi Nginx cukup mudah, karena sudah terdapat di dalam repository Fedora itu sendiri.
Sebelum memulai proses instalasi, login sebagai root terlebih dahulu
su -
atau
su root
Instalasi Nginx
yum install nginx
Instalasi PHP
yum install php-mbstring php-mcrypt php-mysql php-common php-gd php-cli php php-pdo php-fpm php-xml
Instalasi MySQL Client dan MySQL Server
yum install mysql mysql-serverInstalasi phpMyAdmin
yum install phpmyadmin
Setelah selesai instalasi diatas, sekarang jalankan service nginx dan mysql
service httpd start ; service mysqld startHapus file /etc/nginx/nginx.conf lalu ubah dengan
user  nginx;
worker_processes  5;

error_log  /var/log/nginx/error.log;
#error_log  /var/log/nginx/error.log  notice;
#error_log  /var/log/nginx/error.log  info;

pid        /run/nginx.pid;


events {
    worker_connections  1024;
}


http {
    include       /etc/nginx/mime.types;
    default_type  application/octet-stream;

    log_format  main  '$remote_addr - $remote_user [$time_local] "$request" '
                      '$status $body_bytes_sent "$http_referer" '
                      '"$http_user_agent" "$http_x_forwarded_for"';

    access_log  /var/log/nginx/access.log  main;

    sendfile        on;
    #tcp_nopush     on;

    #keepalive_timeout  0;
    keepalive_timeout  65;

    #gzip  on;

    server {
        listen       80;
        server_name  localhost;

        #charset koi8-r;

        access_log  /var/log/nginx/host.access.log  main;

        location / {
            root   /usr/share/nginx/html;
            index  index.html index.htm index.php;
        }

        # redirect server error pages to the static page /40x.html
        #
        error_page  404              /404.html;
        location = /40x.html {
            root   /usr/share/nginx/html;
        }

        # redirect server error pages to the static page /50x.html
        #
        error_page   500 502 503 504  /50x.html;
        location = /50x.html {
            root   /usr/share/nginx/html;
        }

        # proxy the PHP scripts to Apache listening on 127.0.0.1:80
        #
        #location ~ \.php$ {
        #    proxy_pass   http://127.0.0.1;
        #}

        # pass the PHP scripts to FastCGI server listening on 127.0.0.1:9000
        #
        location ~ \.php$ {
            root            /usr/share/nginx/html;
            fastcgi_pass   127.0.0.1:9000;
            fastcgi_index  index.php;
#            fastcgi_param  SCRIPT_FILENAME  /scripts$fastcgi_script_name;
		fastcgi_param  SCRIPT_FILENAME   $document_root$fastcgi_script_name;
            include        fastcgi_params;
        }

        # deny access to .htaccess files, if Apache's document root
        # concurs with nginx's one
        #
        #location ~ /\.ht {
        #    deny  all;
        #}
    }


    # another virtual host using mix of IP-, name-, and port-based configuration
    #
    #server {
    #    listen       8000;
    #    listen       somename:8080;
    #    server_name  somename  alias  another.alias;

    #    location / {
    #        root   html;
    #        index  index.html index.htm;
    #    }
    #}


    # HTTPS server
    #
    #server {
    #    listen       443;
    #    server_name  localhost;

    #    ssl                  on;
    #    ssl_certificate      cert.pem;
    #    ssl_certificate_key  cert.key;

    #    ssl_session_timeout  5m;

    #    ssl_protocols  SSLv2 SSLv3 TLSv1;
    #    ssl_ciphers  HIGH:!aNULL:!MD5;
    #    ssl_prefer_server_ciphers   on;

    #    location / {
    #        root   html;
    #        index  index.html index.htm;
    #    }
    #}

}
Buka /etc/php-fpm.d/www.conf ubah bagian
user = apache
; RPM: Keep a group allowed to write in log dir.
group = apache
menjadi
user = nginx
; RPM: Keep a group allowed to write in log dir.
group = nginx
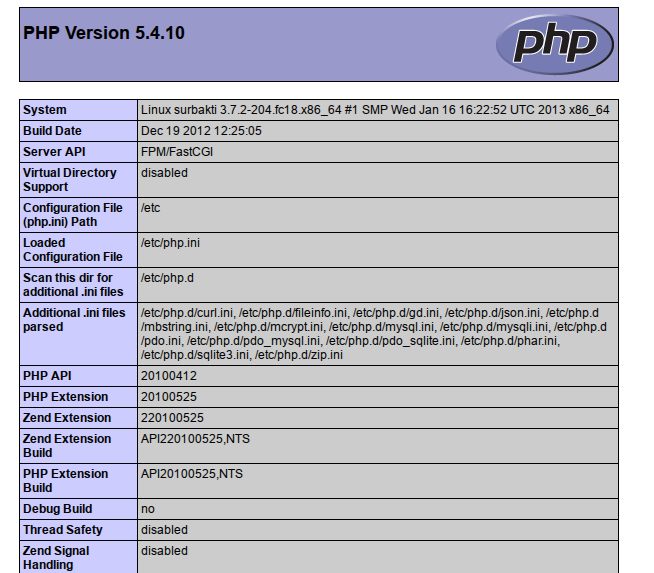
Untuk melihat apakah Nginx dan MySQL telah terhubung, buat sebuah file bernama info.php di /usr/share/nginx/html/ yang berisi
<?php
phpinfo();
?>
Buka di browser anda alamat http://localhost/info.php, tampilannya seperti gambar dibawah ini


